> ## Documentation Index
> Fetch the complete documentation index at: https://docs.fly.io/llms.txt
> Use this file to discover all available pages before exploring further.
# Connecting Livebook to Your App in Production
[Livebook](https://github.com/elixir-nx/livebook) is an exciting advancement in the Elixir community. It was created for the Elixir machine learning library [Nx](https://github.com/elixir-nx/nx). You can think of it as Elixir's version of [Jupyter Notebooks](https://jupyter.org/).
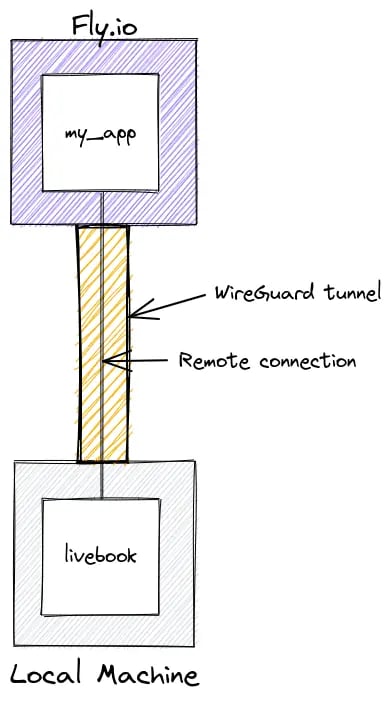
Livebook ends up being very flexible and powerful. Because Elixir nodes can easily be clustered together, you can run Livebook on your local machine, connect it to your Elixir servers, and do some really interesting things.
Visualizing the setup:
 ## Requirements
There are a few requirements for this to work.
* **Livebook requires Elixir version 1.14.2 or higher**. Livebook runs locally on your machine, so that part is easy to control. However, the **server** side needs to have the same version of Elixir as well. When Livebook connects to the server, it loads some code into the server environment as well. So your server version of Elixir also needs to be 1.14.2 or higher. I recommend making your local version be the same as the production version to reduce potential problems.
* **Known cookie value on your server**. Livebook needs to know the cookie value used on the server. Follow [this guide to give your app a static cookie value](/elixir/the-basics/clustering#the-cookie-situation).
* **WireGuard setup on your local machine**. Follow the Fly.io [Private Network VPN](/networking/private-networking#private-network-vpn) guide to walk through that.
**Elixir Version Tip**
Check the version of Elixir and Erlang specified in your Dockerfile for the deploy. That's the actual version of Elixir your server is running.
You may need to update the version in your Dockerfile and deploy the application before continuing.
## Installing Livebook
There are several ways to [install and run Livebook](https://livebook.dev/#install). [Livebook Desktop](https://news.livebook.dev/introducing-the-livebook-desktop-app-4C8dpu) is really slick and deploying a [Livebook on Fly](https://fly.io/launch/livebook) is super easy.
Livebook Desktop can be installed as an app on Mac and Window. For Linux, we can pull the source or install it as an [Escript](https://github.com/elixir-nx/livebook#escript).
### Using Livebook Desktop
When running [Livebook Desktop](https://livebook.dev/#install), Livebook will invoke on boot a file named `~/.livebookdesktop.sh` on macOS or `%USERPROFILE%\.livebookdesktop.bat` on Windows. This file can be modified to set environment variables used by Livebook, such as:
```
export LIVEBOOK_DISTRIBUTION=name
export ERL_AFLAGS="-proto_dist inet6_tcp"
```
### Install as an Escript
This section assumes you are already setup for [local Elixir development](https://elixir-lang.org/install.html).
Following the Livebook [Escript README section](https://github.com/elixir-nx/livebook#escript), this is how to install Livebook.
```
mix do local.rebar --force, local.hex --force
mix escript.install hex livebook
```
Then locally launching Livebook is:
```bash theme={null}
livebook server
```
When connecting to a Fly.io app, we can pass the needed ENV value like this:
```bash theme={null}
LIVEBOOK_DISTRIBUTION=name ERL_AFLAGS="-proto_dist inet6_tcp" livebook server
```
**Upgrading an Escript Installed Livebook**
When upgrading your Livebook version while using [asdf](https://asdf-vm.com/) for managing your Elixir and Erlang installs, then here's a helpful tip:
* Remove the existing `livebook` shim: `rm ~/.asdf/shims/livebook`
* Install the new version: `mix escript.install hex livebook`
* Re-shim to get the command: `asdf reshim elixir`
* Verify you have the upgrade: `livebook --version`
### ENV Values
The `ERL_AFLAGS` settings is passed to the BEAM on startup. The `LIVEBOOK_DISTRIBUTION=name` setting configures Livebook to run with a fully qualified name and to be ready for clustering.
The Livebook README page [documents the supported ENV values](https://github.com/livebook-dev/livebook#environment-variables).
## Running Livebook
Once started, Livebook generates a link in the console you use to connect to it. The Livebook link in the console looks something like this:
```
[Livebook] Application running at http://localhost:8080/?token=uzbwvvpexj7mdftwjilezi4qaygt2bfc
```
With Livebook running locally, let's get started!
### Create or Load a Notebook
Let's create a new notebook to test the remote connection.
Create a new notebook titled, "Remote Connect Test" and add a Section.
On the left side, click the "Runtime settings" as pictured below:
## Requirements
There are a few requirements for this to work.
* **Livebook requires Elixir version 1.14.2 or higher**. Livebook runs locally on your machine, so that part is easy to control. However, the **server** side needs to have the same version of Elixir as well. When Livebook connects to the server, it loads some code into the server environment as well. So your server version of Elixir also needs to be 1.14.2 or higher. I recommend making your local version be the same as the production version to reduce potential problems.
* **Known cookie value on your server**. Livebook needs to know the cookie value used on the server. Follow [this guide to give your app a static cookie value](/elixir/the-basics/clustering#the-cookie-situation).
* **WireGuard setup on your local machine**. Follow the Fly.io [Private Network VPN](/networking/private-networking#private-network-vpn) guide to walk through that.
**Elixir Version Tip**
Check the version of Elixir and Erlang specified in your Dockerfile for the deploy. That's the actual version of Elixir your server is running.
You may need to update the version in your Dockerfile and deploy the application before continuing.
## Installing Livebook
There are several ways to [install and run Livebook](https://livebook.dev/#install). [Livebook Desktop](https://news.livebook.dev/introducing-the-livebook-desktop-app-4C8dpu) is really slick and deploying a [Livebook on Fly](https://fly.io/launch/livebook) is super easy.
Livebook Desktop can be installed as an app on Mac and Window. For Linux, we can pull the source or install it as an [Escript](https://github.com/elixir-nx/livebook#escript).
### Using Livebook Desktop
When running [Livebook Desktop](https://livebook.dev/#install), Livebook will invoke on boot a file named `~/.livebookdesktop.sh` on macOS or `%USERPROFILE%\.livebookdesktop.bat` on Windows. This file can be modified to set environment variables used by Livebook, such as:
```
export LIVEBOOK_DISTRIBUTION=name
export ERL_AFLAGS="-proto_dist inet6_tcp"
```
### Install as an Escript
This section assumes you are already setup for [local Elixir development](https://elixir-lang.org/install.html).
Following the Livebook [Escript README section](https://github.com/elixir-nx/livebook#escript), this is how to install Livebook.
```
mix do local.rebar --force, local.hex --force
mix escript.install hex livebook
```
Then locally launching Livebook is:
```bash theme={null}
livebook server
```
When connecting to a Fly.io app, we can pass the needed ENV value like this:
```bash theme={null}
LIVEBOOK_DISTRIBUTION=name ERL_AFLAGS="-proto_dist inet6_tcp" livebook server
```
**Upgrading an Escript Installed Livebook**
When upgrading your Livebook version while using [asdf](https://asdf-vm.com/) for managing your Elixir and Erlang installs, then here's a helpful tip:
* Remove the existing `livebook` shim: `rm ~/.asdf/shims/livebook`
* Install the new version: `mix escript.install hex livebook`
* Re-shim to get the command: `asdf reshim elixir`
* Verify you have the upgrade: `livebook --version`
### ENV Values
The `ERL_AFLAGS` settings is passed to the BEAM on startup. The `LIVEBOOK_DISTRIBUTION=name` setting configures Livebook to run with a fully qualified name and to be ready for clustering.
The Livebook README page [documents the supported ENV values](https://github.com/livebook-dev/livebook#environment-variables).
## Running Livebook
Once started, Livebook generates a link in the console you use to connect to it. The Livebook link in the console looks something like this:
```
[Livebook] Application running at http://localhost:8080/?token=uzbwvvpexj7mdftwjilezi4qaygt2bfc
```
With Livebook running locally, let's get started!
### Create or Load a Notebook
Let's create a new notebook to test the remote connection.
Create a new notebook titled, "Remote Connect Test" and add a Section.
On the left side, click the "Runtime settings" as pictured below:
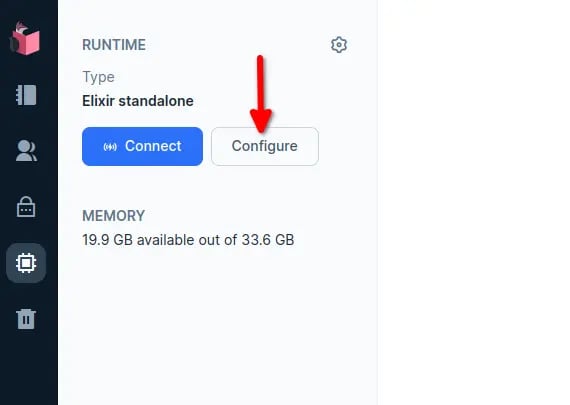
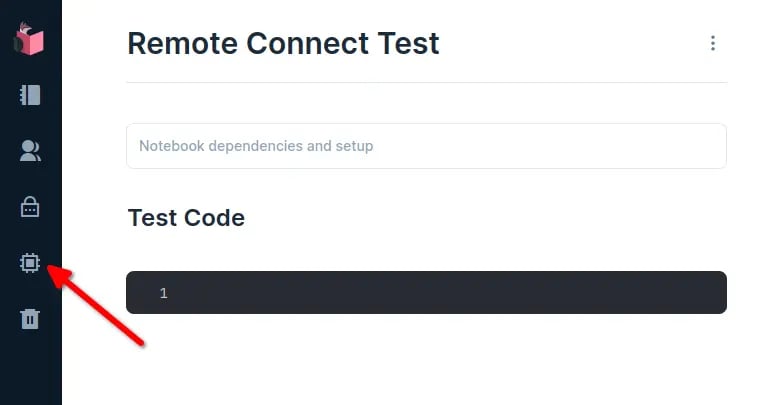 Before we can run any Elixir code, we need to connect to the remote server. To connect to the remote server, we will "Configure" the server we want to connect to.
 Now we use "Attached Node" to connect to an existing Elixir node.
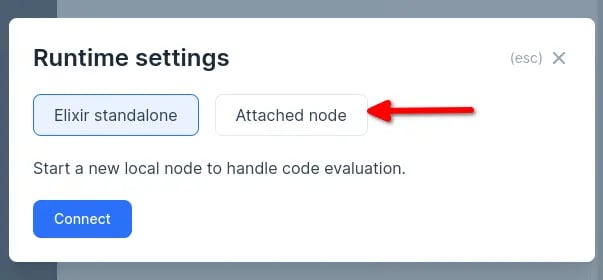 With the "Attached Node" mode selected, we need to provide 2 additional pieces of information before we can connect.
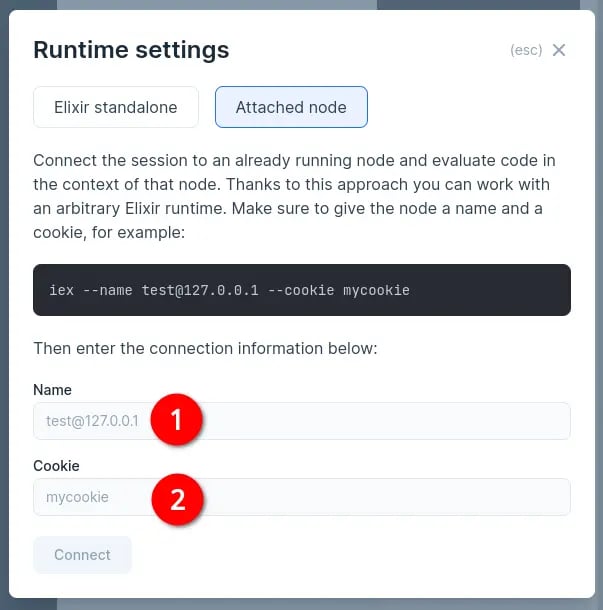 1. **Name** - Our node's name
2. **Cookie** - The cookie value used by the deployed server
### Getting the Node Name
Let's see how to get the node name and private IP address needed. To list your deployed apps:
```bash cmd theme={null}
fly apps list
```
```output output theme={null}
...
icy-leaf-7381 personal running 49m26s ago
```
Get the private IPv6 address for the desired app.
```bash cmd theme={null}
fly ips private --app icy-leaf-7381
```
```output output theme={null}
ID REGION IP
44040812 lax fdaa:0:1da8:a7b:bf88:71ca:52:2
```
Combine the app name with the private IPv6 address to get the full node name. For our example here, it would be:
```
icy-leaf-7381@fdaa:0:1da8:a7b:bf88:71ca:52:2
```
### Using the Cookie
We also need the cookie used by the server. See [this guide](/elixir/the-basics/clustering) for setting that up for your app.
### Attaching to a Fly Server
**REMEMBER:** At this point, make sure your WireGuard connection to Fly is up!
When you have the name and cookie, enter those and "**Connect**" to the server.
**REMEMBER:** Each time we deploy our apps, the private IP will change. We need to get the current IP before we can connect again.
Once connected, we have code completion available in the Elixir cells for the app we are connected to. The [HelloElixir app](https://github.com/fly-apps/hello_elixir) doesn't have anything useful to run so we can just prove to ourselves that our code is being executed remotely.
Add the following code to a Livebook Elixir cell and execute it.
```elixir theme={null}
require Logger
Logger.info("Testing logger")
```
Now, check the logs of the production app. You should find your logger output there!
```bash cmd theme={null}
fly logs
```
```output output theme={null}
...
2021-06-21T22:47:21.415426797Z app[44040812] sjc [info] 22:47:21.414 [info] Testing logger
```
### Success!
We successfully executed Elixir code through Livebook connected to a remote server running on Fly.io! The code was actually executed on the server!
Looking for things to do now that you're connected? Check out: [Do Interesting Things with Livebook and Your Production App](/elixir/advanced-guides/interesting-things-with-livebook)
## Troubleshooting Checklist
If you have problems connecting, here are a few things to check:
* Ensure your WireGuard connection is up.
* Check that the version of Elixir on the server is 1.14.2 or higher.
* Check that the version of Elixir declared in the project's Dockerfile.
* Check that the version of Elixir on the client matches the server.
* If you re-deployed, you need to get the new IP address for the deployed app.
* Check the server logs. Failed connections may still log errors at the server.
* Check the local livebook logs. Failed connections may log helpful messages.
1. **Name** - Our node's name
2. **Cookie** - The cookie value used by the deployed server
### Getting the Node Name
Let's see how to get the node name and private IP address needed. To list your deployed apps:
```bash cmd theme={null}
fly apps list
```
```output output theme={null}
...
icy-leaf-7381 personal running 49m26s ago
```
Get the private IPv6 address for the desired app.
```bash cmd theme={null}
fly ips private --app icy-leaf-7381
```
```output output theme={null}
ID REGION IP
44040812 lax fdaa:0:1da8:a7b:bf88:71ca:52:2
```
Combine the app name with the private IPv6 address to get the full node name. For our example here, it would be:
```
icy-leaf-7381@fdaa:0:1da8:a7b:bf88:71ca:52:2
```
### Using the Cookie
We also need the cookie used by the server. See [this guide](/elixir/the-basics/clustering) for setting that up for your app.
### Attaching to a Fly Server
**REMEMBER:** At this point, make sure your WireGuard connection to Fly is up!
When you have the name and cookie, enter those and "**Connect**" to the server.
**REMEMBER:** Each time we deploy our apps, the private IP will change. We need to get the current IP before we can connect again.
Once connected, we have code completion available in the Elixir cells for the app we are connected to. The [HelloElixir app](https://github.com/fly-apps/hello_elixir) doesn't have anything useful to run so we can just prove to ourselves that our code is being executed remotely.
Add the following code to a Livebook Elixir cell and execute it.
```elixir theme={null}
require Logger
Logger.info("Testing logger")
```
Now, check the logs of the production app. You should find your logger output there!
```bash cmd theme={null}
fly logs
```
```output output theme={null}
...
2021-06-21T22:47:21.415426797Z app[44040812] sjc [info] 22:47:21.414 [info] Testing logger
```
### Success!
We successfully executed Elixir code through Livebook connected to a remote server running on Fly.io! The code was actually executed on the server!
Looking for things to do now that you're connected? Check out: [Do Interesting Things with Livebook and Your Production App](/elixir/advanced-guides/interesting-things-with-livebook)
## Troubleshooting Checklist
If you have problems connecting, here are a few things to check:
* Ensure your WireGuard connection is up.
* Check that the version of Elixir on the server is 1.14.2 or higher.
* Check that the version of Elixir declared in the project's Dockerfile.
* Check that the version of Elixir on the client matches the server.
* If you re-deployed, you need to get the new IP address for the deployed app.
* Check the server logs. Failed connections may still log errors at the server.
* Check the local livebook logs. Failed connections may log helpful messages.